The Ansible Automation Platform Openshift Operator
Let’s set the stage for all of my content As I build demos and content to share, it’s important that I have and easy, repeatable way to demonstrate capabili...


As I build demos and content to share, it’s important that I have and easy, repeatable way to demonstrate capabilities that you can use. I’ve already covered what the hardware in my homelab looks like and the core infrastructure software I use including the real superhero of modern computing, which is Kubernetes. In my case, that comes in the form of Red Hat Openshift Container Platform.
The goal of my lab is to represent an enterprise environment as closely as I can, with a “future-now” approach. What I mean by that is that many of the customers I speak with aren’t yet deploying software on Kubernetes or Openshift, however many have been deploying container-based workloads on some flavor of Kubernetes for many years. For those who are already familiar, what I’m going to show you here will feel “normal.” For those who aren’t, I’ll do my best to explain some of the details as best I can.
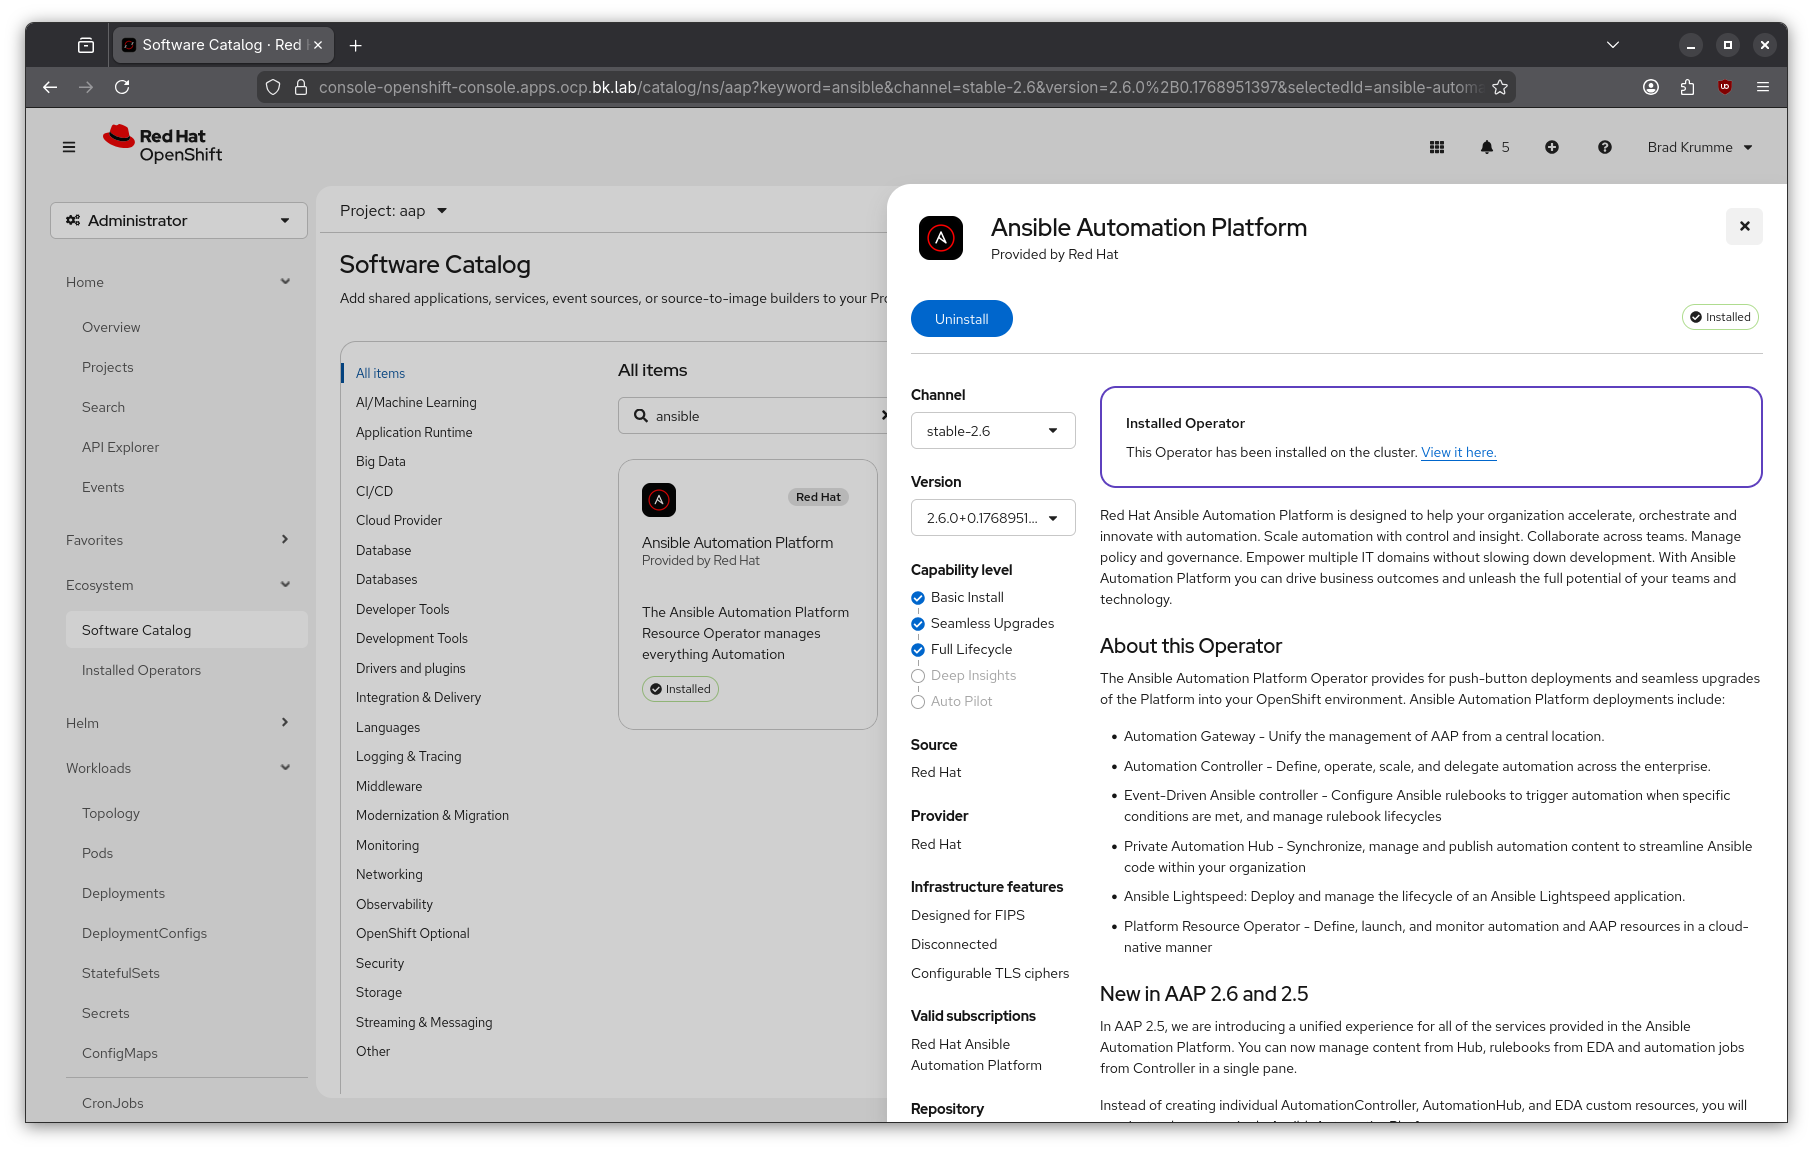
A large amount of the content I share has Ansible as a focus, it makes sense to explain a bit about how I enable the Ansible Automation Platform in my lab. This starts with the Ansible Automation Platform Operator.
To really understand the value the AAP Operator provides it would make sense to start with what an operator is and why they are valuable when running enterprise software on Kubernetes.
The CoreOS Linux development team pioneered the Kubernetes Operator concept in 2016 while searching for a solution to automatically manage container workloads in Kubernetes. The core concept is to take advantage of the automation capabilities inherent to Kubernetes in order to manage instances of complex applications without the need to customize Kubernetes itself. The operator’s aim is to codify the knowledge that would be attributed to a human who is managing a service or set of services for their organization. By capturing this operational knowledge as a custom Kubernetes controller and set of one or more custom resources, instances of those services or sets of services can be quickly and easily deployed, configured, and managed without the need to build, maintain, and integrate all of the service’s components each and every time.
Over the last several years, I have had numerous conversations about Ansible and more specifically the Ansible Automation Platform. I think it makes sense to level-set about what both Ansible and AAP are and also what they aren’t.
Ansible is an automation engine. It has the capability to automate provisioning, installation, configuration, deployment, and management of software, services, and processes. It uses a modular approach to automation, meaning that anyone can contribute automation capability for a software or hardware product, service, or API. I like to summarize by saying that if your process, device, or program touches a network or is attached to something which touches a network, it can be automated using Ansible. There is a vibrant community of Ansible users and contributors, making Ansible one of the most powerful automation tools available today.
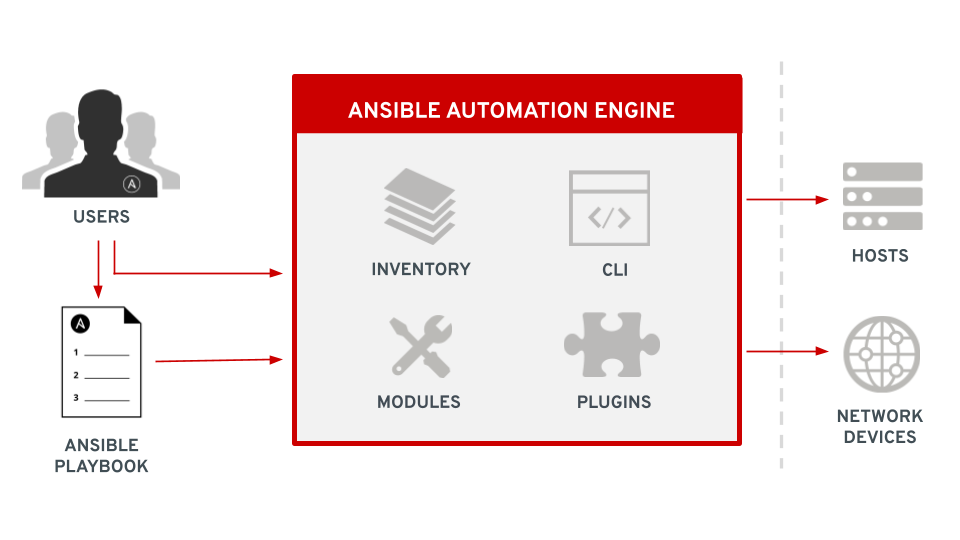
Ansible employs a centralized control node which acts as an orchestrator. Ansible is installed only on the control node and there is no need for an agent or software other than python (or powershell for Windows) to be installed elsewhere. Managed nodes are defined in a list called inventory which can contain servers, network devices, workstations, and other endpoints. Automation processes are defined in playbooks which are written in yaml and include a list of plays with each play containing the parameters for that play and a list of tasks for the hosts defined in the play. Tasks define a module and other details about individual units of automation work. Modules are pre-written, parameterized pieces of automation code, usually written in python (or powershell for Windows) which perform specific actions on our managed nodes such as installing packages, copying data, and deploying configuration templates. Ansible also employs plugins which allow for extra non-automation functionality such as privilege escalation and data filtering. Ansible is executed using a command line interface or CLI which reads the defined playbook, connects to the remote managed nodes and executes the module code.
Ansible Automation Platform extends the capabilities of Ansible by enabling IT organizations to create, manage, and scale automation. This includes multiple additional software components which provide the user interface, APIs, integrations, and capabilities an enterprise needs to maintain control of and visibility into automation across their entire IT landscape. AAP also includes coding and development tools, certified module, role, and plugin content, tools for organization and curation of custom and collected content, analytics tools, and event-driven capabilities, making it a platform for much more than just automation.
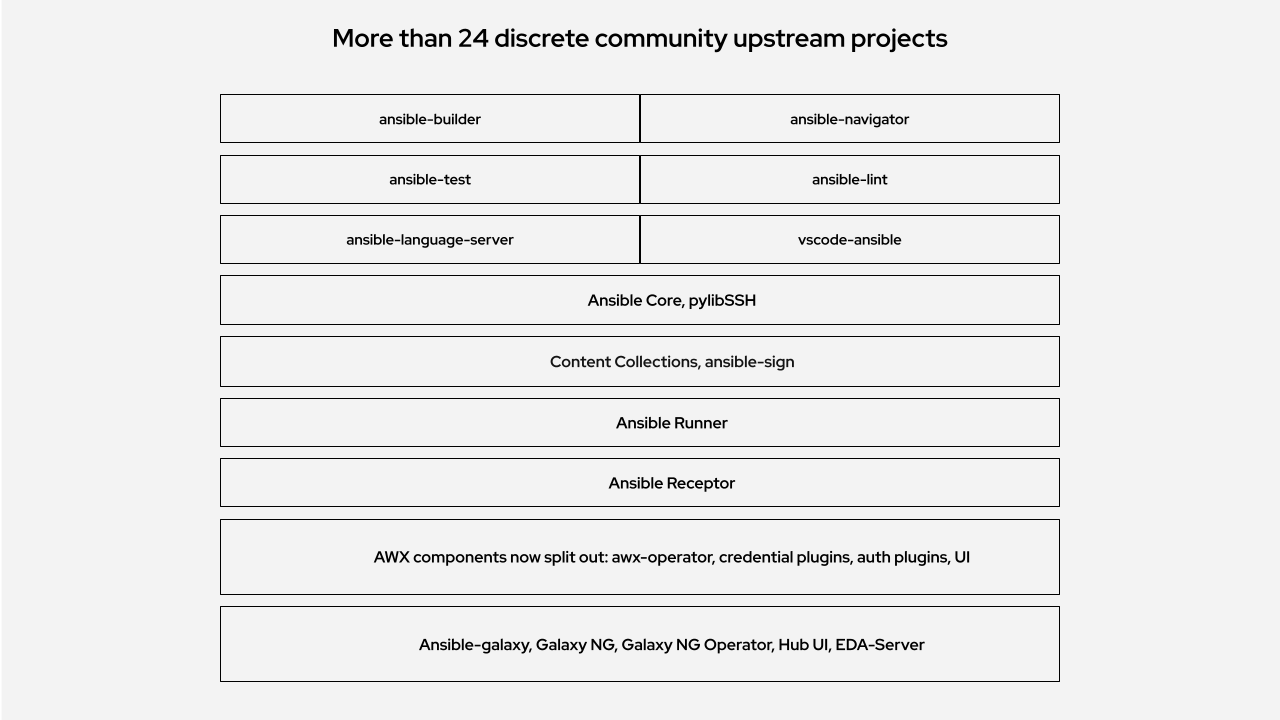
Many IT professionals who are familiar with Ansible know about the AWX project, also known as Automation Controller (previously known as Ansible Tower). At one time, Ansible Automation Platform consisted only of the API and UI that made up AWX/Tower. Now, there are over 24 open-source projects which make up the platform, including AWX, galaxy___ng, eda-server, and much, much more. All of these upstream projects have been integrated into one single, supported platform.
Long story short, Ansible Automation Platform is much more than AWX or Ansible Tower.
The additional components of Ansible Automation Platform make it an excellent candidate for delivery as Kubernetes operator.
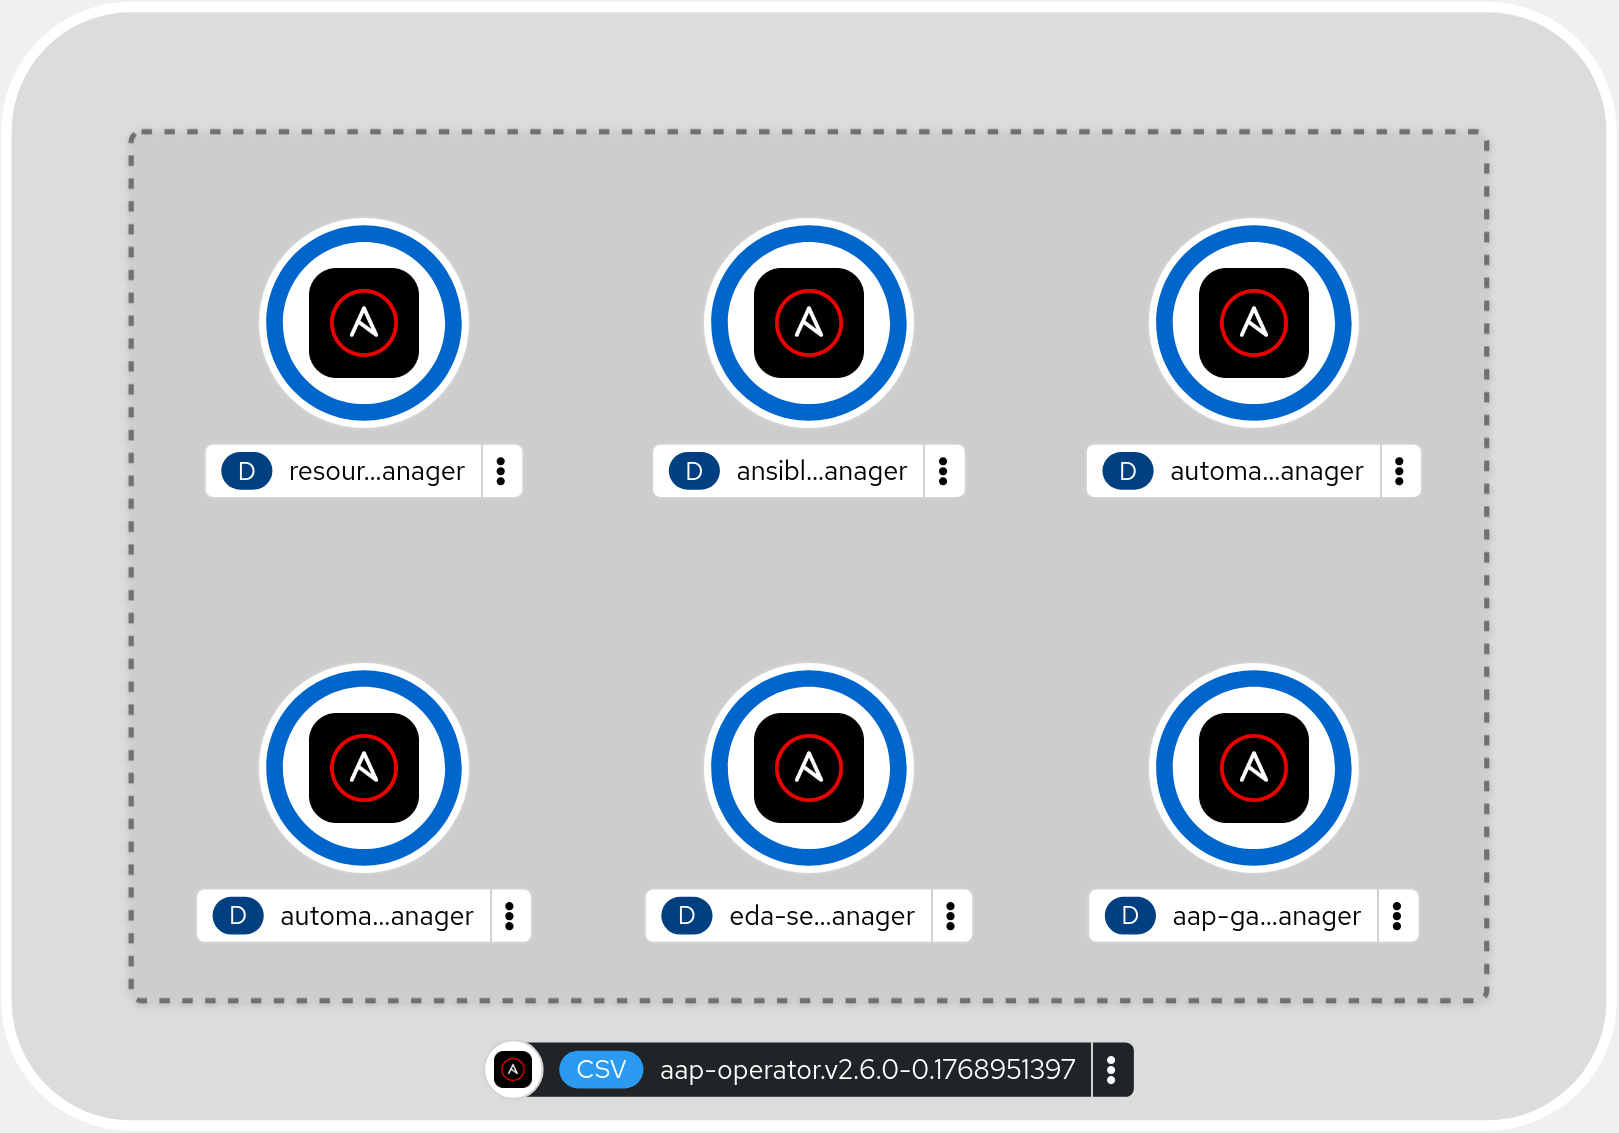
The operator includes 6 controller-managers which get deployed in an Openshift cluster. Those controller-managers continuously evaluate either the entire cluster, or a specific namespace, ensuring that any custom resources created via the operator’s custom resource definitions remains in the configuration which was defined when it was deployed.
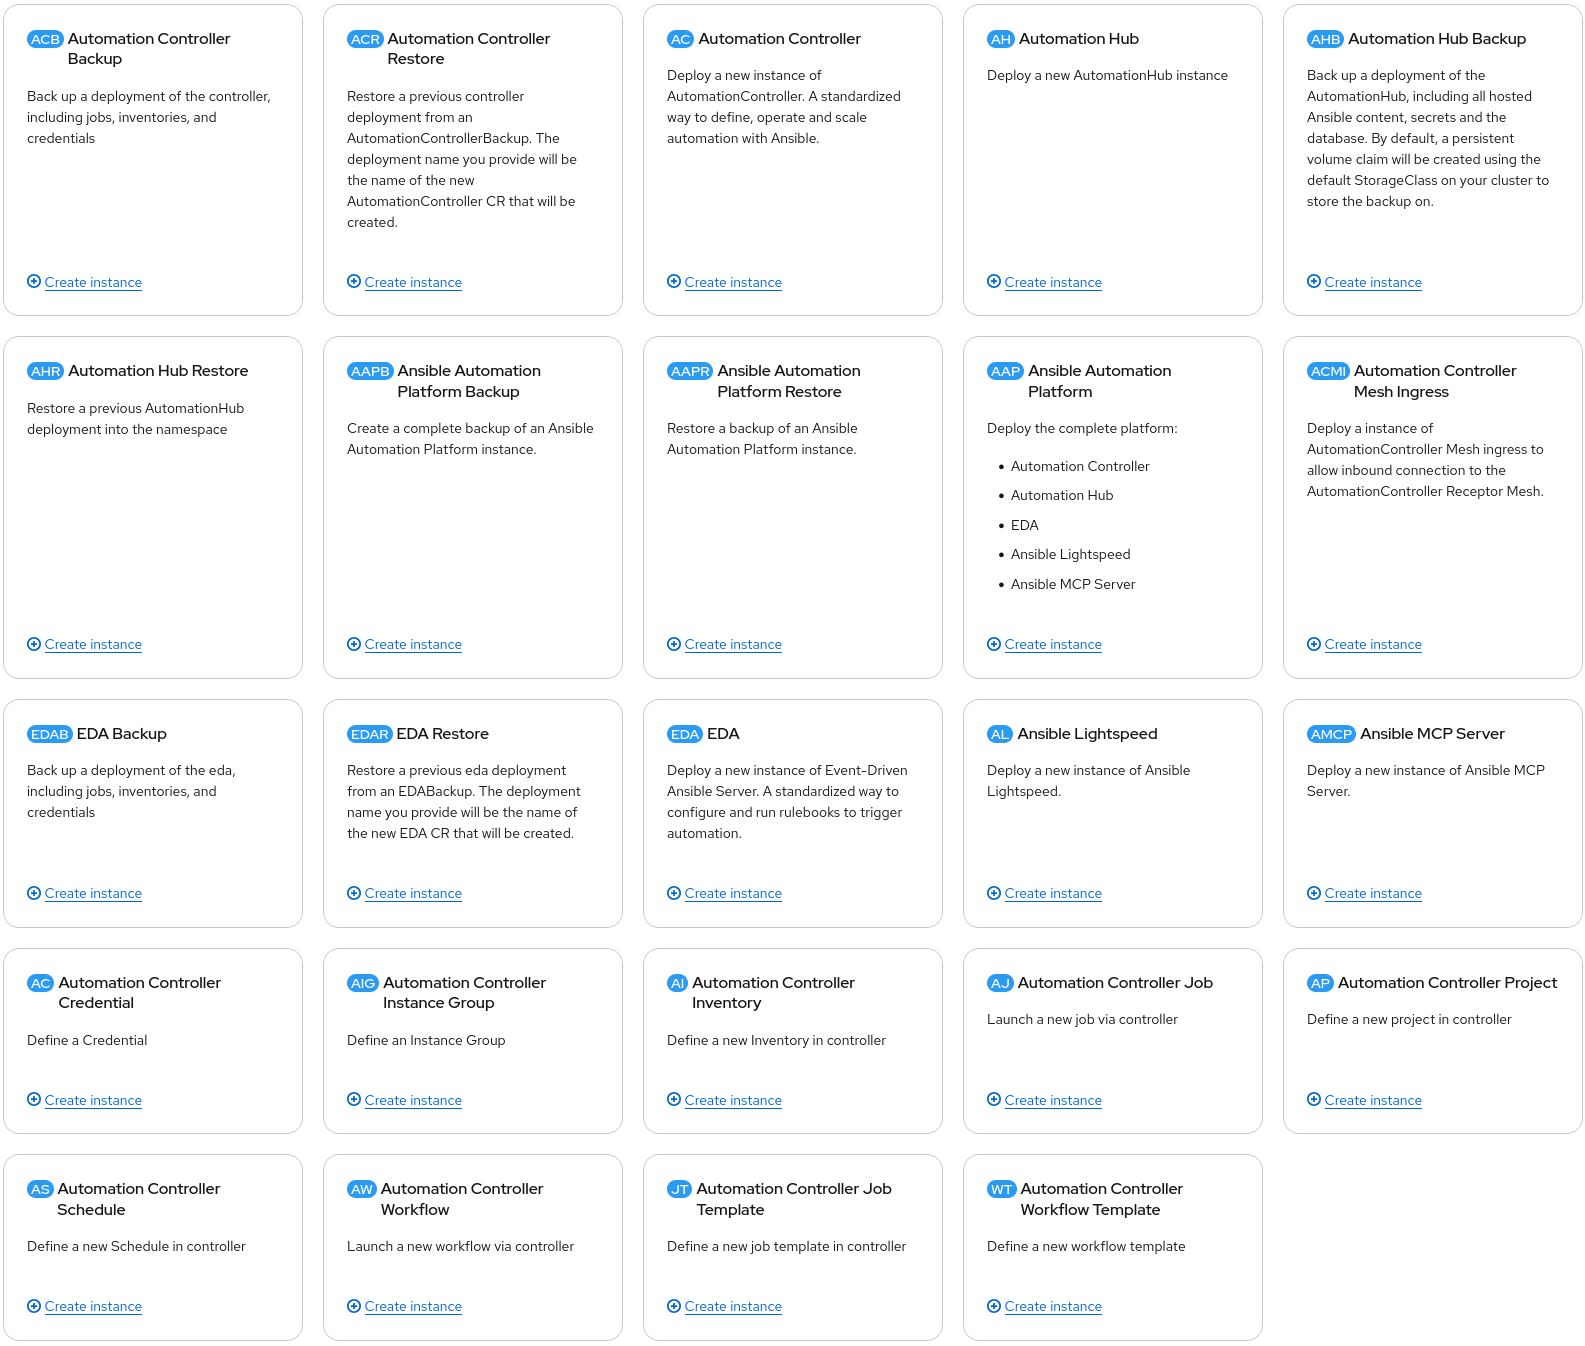
There are a multitude custom resource definitions which can be used to deploy components of Ansible Automation Platform, either as a fully integrated, complete platform, or as individual components. Additionally, there are backup and restore capabilities as well as resource deployment options included. This means disaster recovery solutions are built into the operator itself and individual automation resources can be deployed into Ansible Automation Platform itself. This adds the additional benefit of making Configuration as Code via modern CI/CD or GitOps tools a real possibility, right out of the box. The CRDs can be used to deploy all of the necessary Inventories, Credentials, Projects, Job Templates, and Workflows for your automation needs, all via deployment pipelines as you would for any other application.
Installing the Ansible Automation Platform operator is straightforward. There are some prerequisites and recommendations.
I’m only going to cover the command-line instructions here. For instructions regarding the UI, refer to the official Red Hat Documentation
To install the AAP operator, you first need to log in to your cluster with appropriate privileges and create a project/namespace.
oc login -u <username> https://api.<cluster_fqdn>:6443
oc new-project ansible-automation-platform
Then you need to create a subscription manifest to subscribe to the Ansible Automation Platform operator. You can name this file something like sub.yaml
 apiVersion: operators.coreos.com/v1
 kind: OperatorGroup
 metadata:
   name: ansible-automation-platform-operator
   namespace: ansible-automation-platform
 spec:
   targetNamespaces:
     - ansible-automation-platform
 ---
 apiVersion: operators.coreos.com/v1alpha1
 kind: Subscription
 metadata:
   name: ansible-automation-platform
   namespace: ansible-automation-platform
 spec:
   channel: 'stable-2.6'
   installPlanApproval: Automatic
   name: ansible-automation-platform-operator
   source: redhat-operators
   sourceNamespace: openshift-marketplace
This subscription manifest will create a subscription called ansible-automation-platform which subscribes the ansible-automation-platform namespace to the ansible-automation-platform-operator operator.
Run oc apply to apply the subscription
oc apply -f sub.yaml
Verify that the CSV PHASE reports “Succeeded” before proceeding.
 oc get csv -n ansible-automation-platform

 NAME                               DISPLAY                       VERSION              REPLACES                           PHASE
 aap-operator.v2.6.0-0.1728520175   Ansible Automation Platform   2.6.0+0.1728520175   aap-operator.v2.6.0-0.1727875185   Succeeded
Succeeded means that the operator was installed successfully and the controller-managers are evaluating the ansible-automation-platform namespace for any custom resources deployed via the operator.
Now that the operator is installed, we can use the AnsibleAutomationPlatform custom resource definition to deploy a complete instance of AAP, including the Platform Gateway, Automation Controller, Automation Hub, and Event-Driven Ansible Controller. This one manifest will deploy all of the components of the platform, the necessary database(s), redis, and any dependent storage required for Ansible Automation Platform.
Create a manifest for your AAP instance. You can name this file something like aap.yaml
 apiVersion: aap.ansible.com/v1alpha1
 kind: AnsibleAutomationPlatform
 metadata:
   name: example
   namespace: ansible-automation-platform
 spec:
   image_pull_policy: IfNotPresent
   controller:
     disabled: false
   eda:
     disabled: false
   hub:
     disabled: false
     file_storage_size: 500Gi
     file_storage_storage_class: <your-read-write-many-storage-class>
   lightspeed:
     disabled: true
This manifest specifically disables the Ansible Lightspeed components and configures a relatively large storage volume for Automation Hub.
Run oc apply to deploy the Ansible Automation Platform instance
oc apply -f aap.yaml
Now you can watch as all of the pods are started for your shiny, new Ansible Automation Platform installation.
watch "oc get pods -n ansible-automation-platform"
 Every 2.0s: oc get pods | grep example

 example-controller-migration-4.7.8-zd4q6                          0/1     Completed   0               3m16s
 example-controller-task-7c75565d6c-kr5c4                          4/4     Running     0               3m20s
 example-controller-web-7868bd8f87-nj9q6                           3/3     Running     0               3m22s
 example-eda-activation-worker-5b658fc85c-m7jt2                    1/1     Running     0               3m35s
 example-eda-activation-worker-5b658fc85c-vwqnz                    1/1     Running     0               3m35s
 ...
 ...
When the platform has completed installation, you can find the route to access the AAP instance.
 oc get route
 NAME                    HOST/PORT                                   PATH   SERVICES                        PORT   TERMINATION     WILDCARD
 example              example-aap.apps.ocp.bk.lab                     example                      http   edge/Redirect   None
 example-controller   example-controller-aap.apps.ocp.bk.lab          example-controller-service   http   edge/Redirect   None
 example-eda          example-eda-aap.apps.ocp.bk.lab                 example-eda-api              8000   edge/Redirect   None
 example-hub          example-hub-aap.apps.ocp.bk.lab          /      example-hub-web-svc          8080   edge/Redirect   None
Extract the admin password from the example-admin-password secret
oc get secret example-admin-password --template="{{.data.password|base64decode}}"
Find the route to your instance. It is the one in the list which matches the name of the instance you deployed, in this case the top one in the list.
 oc get route
 NAME                    HOST/PORT                                   PATH   SERVICES                        PORT   TERMINATION     WILDCARD
 example                 example-aap.apps.ocp.bk.lab                        example                         http   edge/Redirect   None
 example-controller      example-controller-aap.apps.ocp.bk.lab             example-controller-service      http   edge/Redirect   None
 example-eda             example-eda-aap.apps.ocp.bk.lab                    example-eda-api                 8000   edge/Redirect   None
 example-hub             example-hub-aap.apps.ocp.bk.lab             /      example-hub-web-svc             8080   edge/Redirect   None
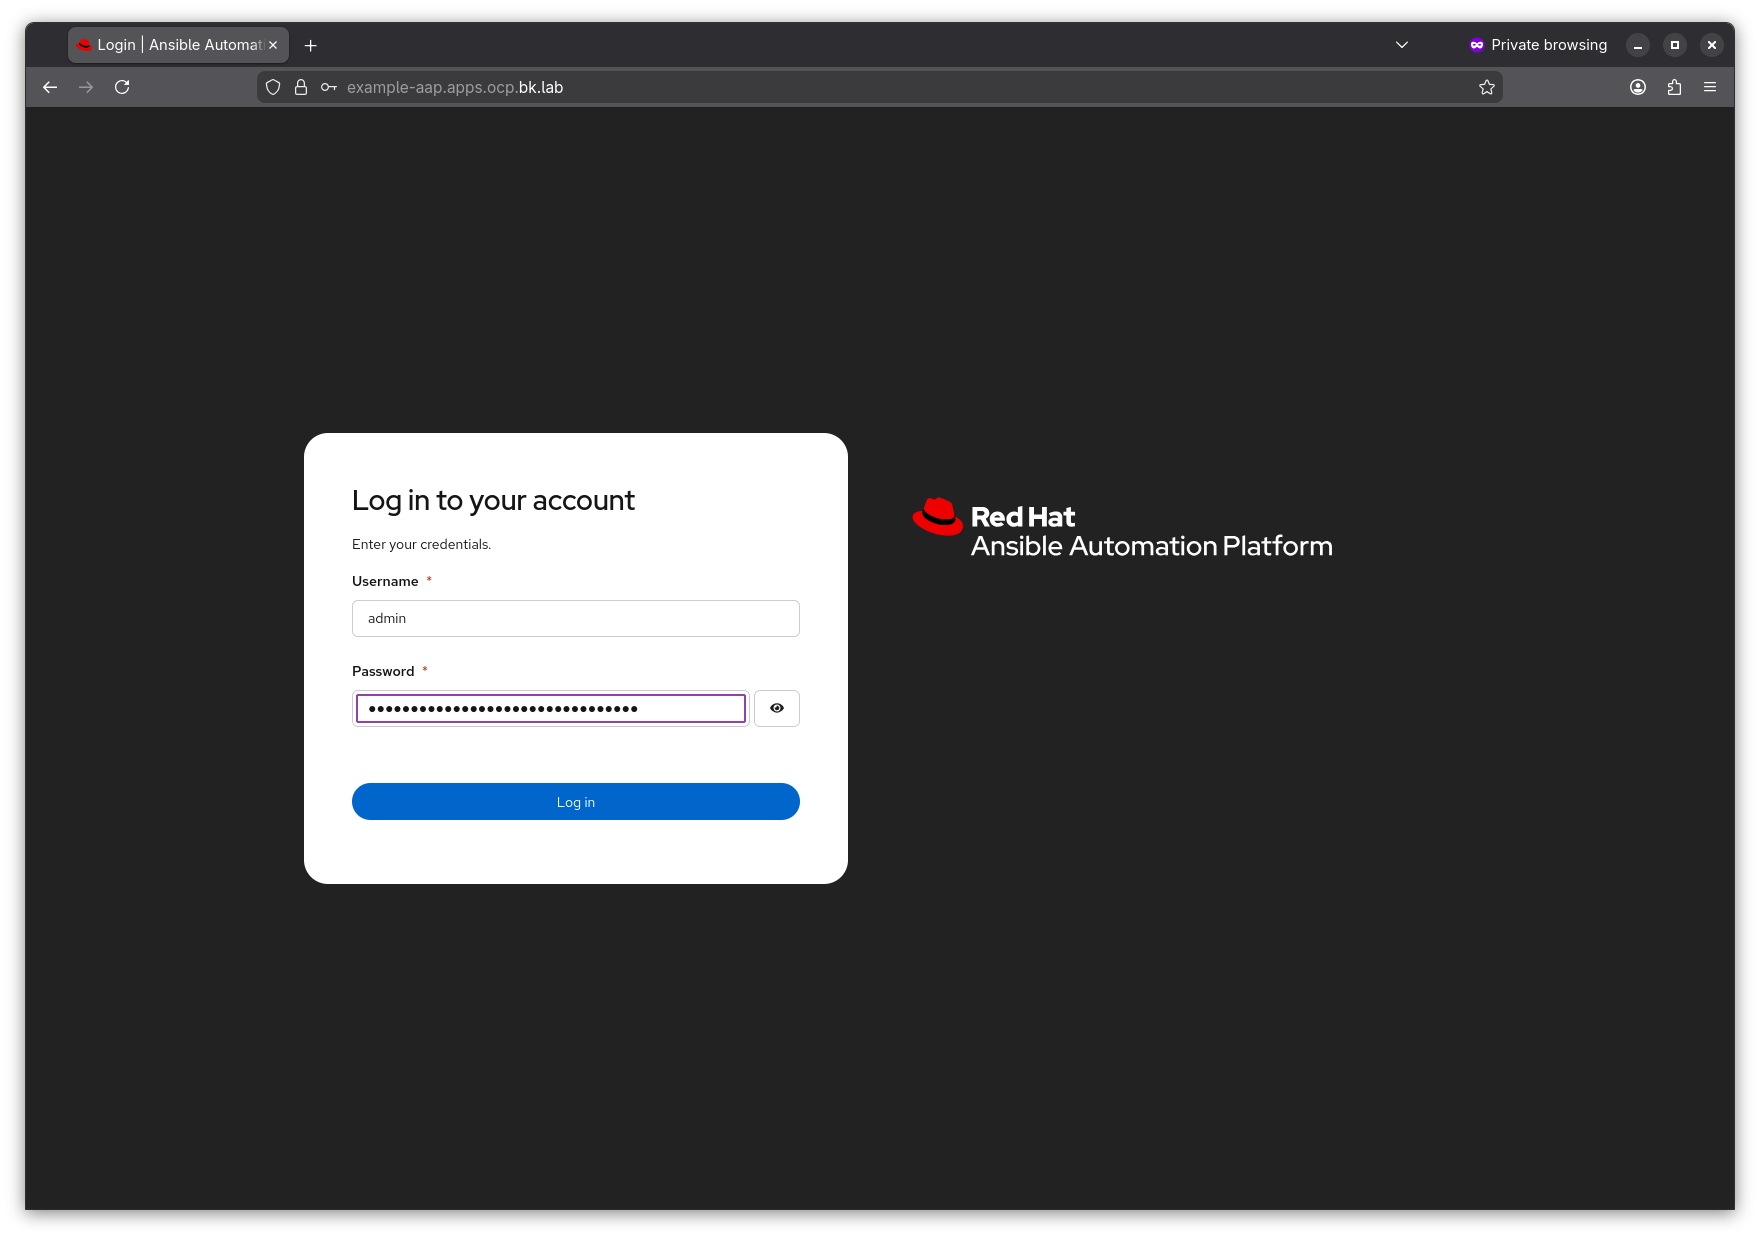
Browse to the url in a web browser, in this case example-aap.apps.ocp.bk.lab and log in using the username admin and the password extracted from step 5
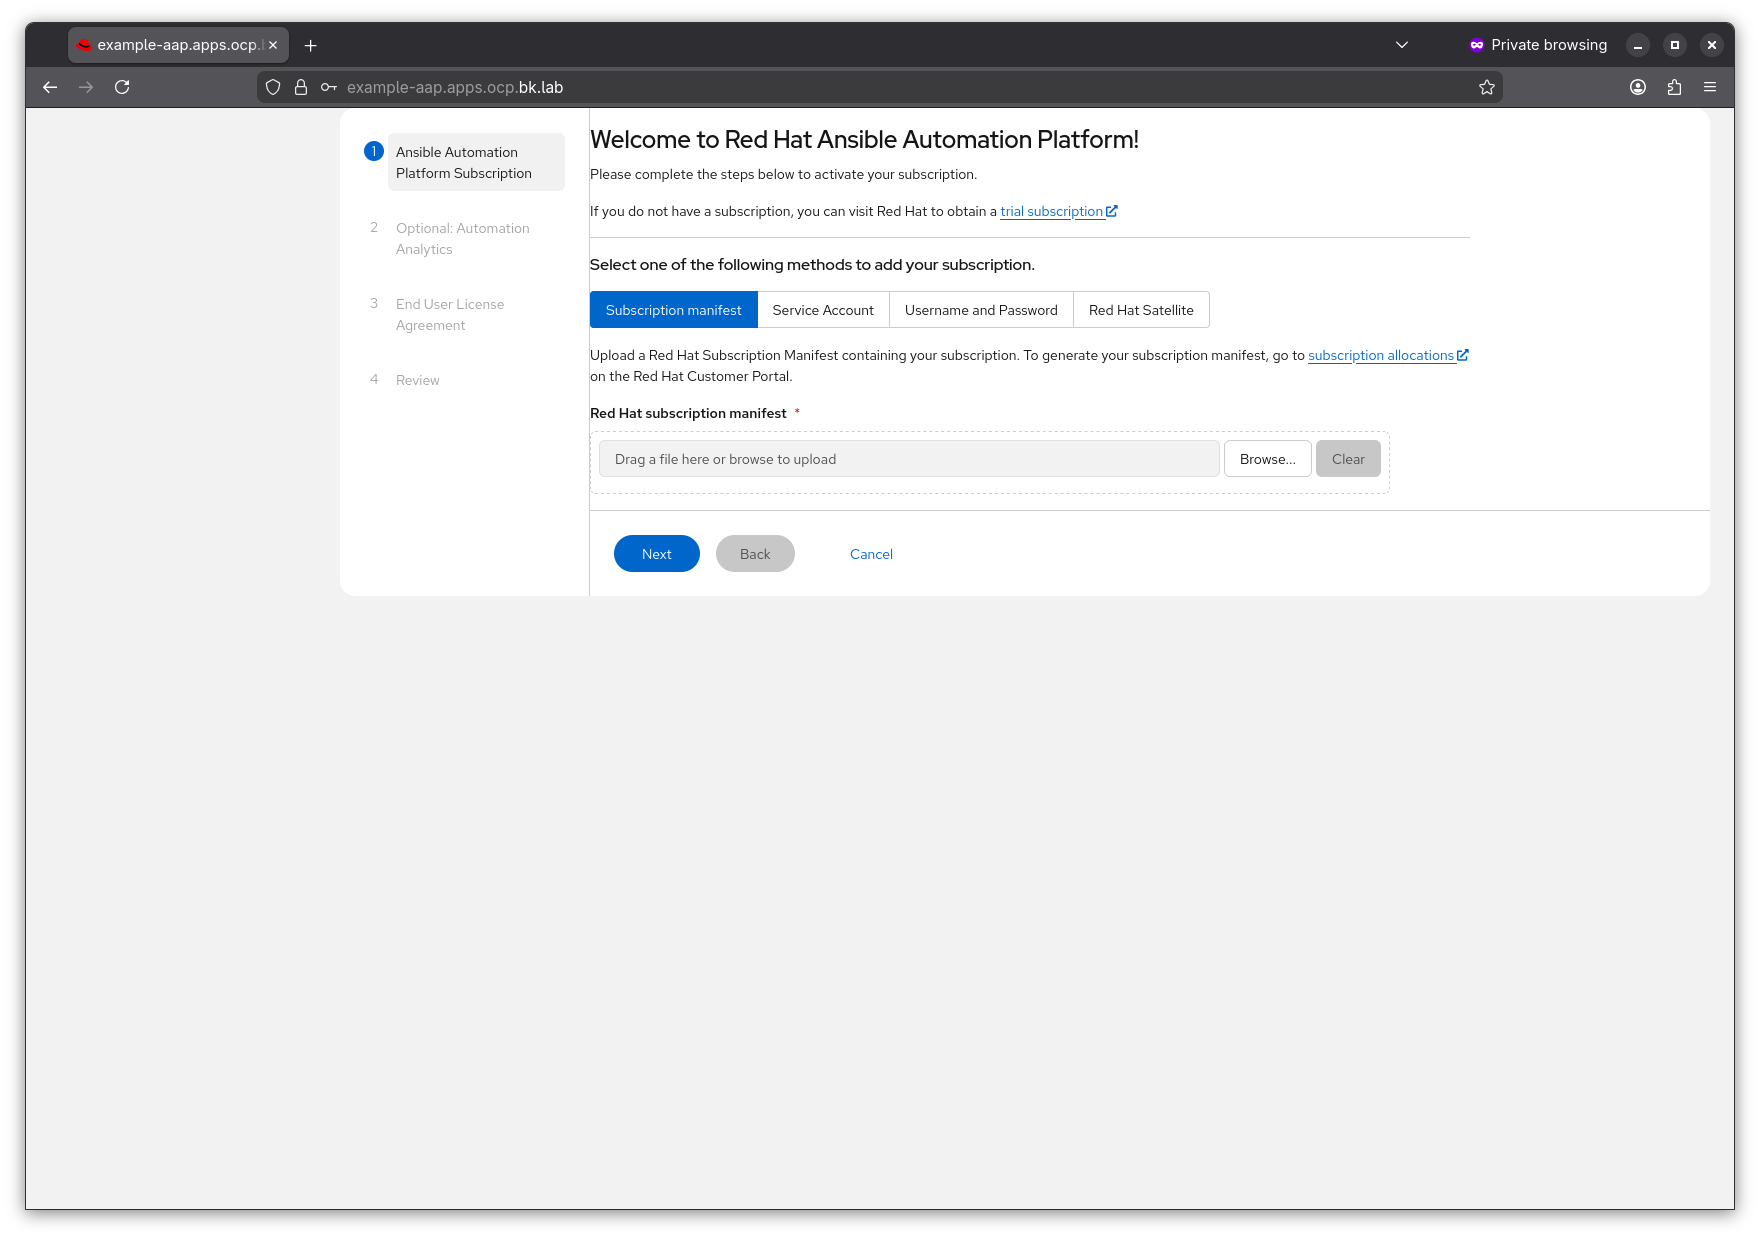
From here you will need to attach a valid Ansible Automation Platform subscription. I’m not covering that here. If you want to try out AAP, or have AAP subscriptions and you don’t know how to get them, reach out to your Red Hat account team.
The Ansible Automation Platform Operator for Openshift is an easy and efficient way to enable a production ready Ansible Automation Platform installation for all of your enterprise automation needs, especially in cases where you already have Openshift up and running.
For those without Openshift, I will follow up with a post regarding the Containerized installation method, which runs on Red Hat Enterprise Linux. It still utilizes containers, but does not require the overhead of also running Openshift.
Let’s set the stage for all of my content As I build demos and content to share, it’s important that I have and easy, repeatable way to demonstrate capabili...
What’s going on with me in 2026 The beginning of every new calendar year comes with change especially when, like me, you work in a large Enterprise sales or...
It’s been a couple of months… I was working hard on the Ansible + Terraform series…and was almost ready to complete part 3 (which is still coming, btw!), bu...
There’s still more than one best tool… In Part 1, I showed you how to configure a basic Terraform project and deploy some infrastructure, in particular EC2 ...
There’s more than one best tool… Terraform and Ansible working together is a subject I get asked about fairly regularly. Most of the time, the way the conv...
Just like the environments we work with in datacenters and clouds, a homelab can consist of a variety of hardware, software, configurations, interdependencie...
Making visual improvements You’ll notice that I keep making visual changes to the site. As I find improvements or add pages, they will seem to just magical...
Slight snafu…easy fix! I made a little boo-boo and used a domain name and blog name that I shouldn’t have. All is well and I’ve updated the site to somethi...
Let’s configure custom DNS In my efforts to share knowledge about tech things, setting up a blog seemed like one of the easier things to do. It is a challe...
Welcome to Brad Does Tech This is where I’ll be posting about cool tech things I learn or demo for my customers. Stay tuned for more! –Brad